More Croquet Hints
How to Improve
some hints from a relatively recent beginner (Richard Griffiths)
During coaching sessions I hear very recent beginners complain “It’s alright for you; I’m only a beginner. You’ve forgotten what it’s like to be a beginner”, and they have a point. So, here is a relatively recent beginner who still remembers, and I have some hints based on watching coaching games (and others!) this season (2006).
You may be receptive to or irritated by management recipes that attempt to encapsulate advice in some alliterative grouping (the Six Ps etc). These usually irritate me, as I find them condescending, and I wonder how they work in other languages. But they may have some merit, and I have to admit there is a useful one for me in croquet: the 3 Ts – Tactics, Technique and Temperament. I think these categories encompass all aspects of the game. As I see it, the ability to exercise concentration is part of temperament, and control is part of technique. The scope of your achievable tactics will grow as you build your repertoire of techniques. And if you achieve a balance of the 3 Ts, you will also attain the third of the 3 Cs – consistency.
How to use these notes. There are 10 hints expressed in about 10 sections. I have tried to be brief, so that you don’t give up because it is too wordy. This means that the content is quite condensed in places, and you may not want to read it in one go. I think it would be best to read one or two sections at a sitting, making sure that you successfully visualise and reflect on how the content applies to your own game before moving on to the next bit. As soon as you can, apply the advice of each section in practice sessions, in coaching games and in real games. To avoid offence, I should state explicitly that I have followed convention in contracting he/she to he throughout.
CONTENTS
1 Go on the lawn with a plan, and plan for success
2 Go for the 4-ball break
3 Use bisques to construct a position
4 Build the break
5 Pursue realistic ambitions, and build your technique
6 Arrange for the next shot to be easy
7 Hit in and get to two balls close to each other
8 Place pioneers at your hoop(s), and not at opponent’s
9 Look at the bigger picture
10 Take opportunities, but not always the obvious ones
Appendix: Picking up the 4 th ball
1 Go on the lawn with a plan, and plan for success
I think this is a top priority, as the lack of a plan so often results in poor shot selection, missed opportunities, and failure to build a better position than you started with. It is often very obvious that a player has no plan and is making up the play shot-by-shot. What are the signs that show this deficiency? Here are some: on making a roquet he does not immediately put the striker’s ball in contact for the croquet shot, and when he eventually does he changes the position from a take-off to a straight drive and back again; he pauses and looks round for ages after every hoop, addresses the ball then shows indecision by looking around again at the other balls, as though they might have moved. Spectators will be asking, “what is there to think about?”, double-bankers will be getting obstructed and having their breaks fragmented, and the opponent will be gaining confidence from the display of indecision.
Perhaps the earliest sign is given when the player goes on the lawn to play an easy roquet that has arisen for one reason or another; he hits in with a shot much harder than is needed, putting the ball into a position that makes the next shot difficult rather than easy, and then stops to think what to do with the croquet shot. This over-hitting tendency is repeated during the break, making positions difficult when they could have been easy. Planning for success does not mean playing with a reckless disregard for what might be given away if things go wrong; of course you need to keep that in mind. But it must not stand in the way of constructive play, which should be directed towards gaining the advantages of a tidy 4-ball break
2 Go for the 4-ball break
From what I have seen as a spectator of the beginners’ coaching sessions, many players do not have this objective clearly in mind, so it gets more space than any other single topic.
Why is the 4-ball break so important? Well, if you want to improve and to get to be as good as you can, then you must go for break-play rather than the 2-ball Aunt Emma tactics. And the 4-ball break configuration is by far the easiest. Now I would hope there would be no dissent from this statement, but I have met several players who tell me that they prefer the 3-ball break, and they offer a number of thoughts to rationalise this view, including:
“If it goes wrong and I have to abandon it, or even lose the innings, I will give away less to my opponent”.
“I like to leave my partner ball near a boundary, so that if the 3-ball break gets out of control I can run away from my opponent’s balls, which will be separated so that he has no short shots. Unless he hits in, by joining up with my partner ball I will keep the innings”.
At first glance the second item above sounds as though it might have some merit, as it shows some thought has been applied, and other things being equal it has a certain attraction. However, there are lots of things wrong with both arguments, the first consideration being that other things are decidedly not equal; the 3-ball break is much more likely to break down than is the 4-ball. To begin with, if you play the 3-ball break leaving your partner ball on a boundary, you will always be attempting to make hoops off your opponent’s ball, which is always less comfortable than being with your partner ball (more on this in the next section). And of course, if you decide you ought to run away, it is decidedly not safe to join up if your opponent still has a bisque, because shooting at a ball on or near a boundary is exactly what the enterprising player with bisques wants to do.
Nonetheless, you will frequently see players make a shot that commits them to the 3-ball break by taking a croquet shot that leaves the other ball behind, instead of advancing it into a useful position. Here “useful” does not necessarily mean that it will be immediately in position as a pivot or a pioneer; perhaps it will only be of full use after a number of further shots. The purpose in not leaving the ball behind is to secure one of the steps in the process of building the position of the balls so that, after a few more shots and hoops, a 4-ball break is achieved.
The decision to leave a ball behind may be explicable either as a deliberate choice to play the 3-ball, or - more often, I suspect - a simple lack of enterprise. Either way, the opportunity for a 4-ball break has not been taken, and the result is usually a rapid degeneration from a 3-ball break to a 2-ball break, followed by a no-ball break, and (even worse) possibly wasting valuable bisques on the way.
I suppose the first point to make in encouraging people to go for the 4-ball rather than the 3-ball break is to ask what relative success rates the player has with the two configurations. Very few people can answer this, because they haven’t submitted themselves to this test. So why do they think along the lines stated above? I think the problem is an over-reaction to the thought that the player knows from experience that he will break down somewhere; he reacts by playing with an excessive expectation of failure, whereas he should be playing with a plan to succeed.
We need to be able to explain why it is that the 4-ball break is not only easier but also less likely to go wrong (this is a different consideration from the easiness factor).
Firstly, why is it easier? It is mainly because the general ball layouts that will allow the break to continue are far more restricted for the 3-ball break, and this is combined with less tolerance for little inaccuracies in the particular positions of the individual balls. For both these reasons it is more difficult to get the balls into this more restricted range of positions. Furthermore, in the 4-ball break you will have two croquet shots instead of one to achieve the desired position. For example, in the 3-ball break the croquet shot after each hoop must place a ball as a pioneer and get the striker’s ball into position to rush the third ball to the next hoop. That means placing two balls with sufficient accuracy in the one shot. In the 4-ball break the placing of the pioneer is still required, but the striker’s ball only needs to get near enough to the 4 th ball (the pivot) to be able to roquet it, and can then get to the 3 rd ball waiting as the pioneer for the next hoop, either by a take-off or from some other croquet shot. That means only one ball has to be placed accurately in each shot, so it’s easier.
Secondly, why is the 4-ball less likely to go wrong? If you have chosen to leave partner ball on a boundary so that you can run away to it if things get untidy, then (as noted above) you will always be attempting to make the hoop off an opponent’s ball. This is always uncomfortable, unless your running position is reliably a foot from the hoop and dead in front. Even then, a 1-foot hoop can be blobbed. But there is an additional and more important consideration; you will never be in a position to try running a hoop from a rather challenging position safe in the knowledge that if you fail you will be with your partner ball, and therefore not handing your opponent a trivial hit-in. Instead, you will always be with an opponent’s ball, so prudence will demand that you run away from those rather challenging positions rather than try for the hoop. This means that you will forego all those opportunities where, safe with your partner ball, you might have taken on and succeeded with a challenging shot, running the hoop and continuing the break. It follows that, if you play prudently, there will be more occasions when you must choose to discontinue the break. And all this depends on you judging correctly when it is best to run away, not always a reliable call.
The situation discussed above had partner ball left out of the game, near a boundary. You also see 3-ball breaks with an opponent’s ball left out. Clearly the “I can run away” argument doesn’t apply here. There is the small advantage that you will be safely with your partner ball at every other hoop, but this is not an adequate compensation for the general disadvantages that are discussed above.
If these detailed arguments fail to find their mark, then let’s ask the player just simply to consider how useful it would be, when things start to go wrong in a 3-ball break, to have the 4 th ball available to use (i.e. to be playing the 4-ball break all along).
3 Use bisques to construct a position
Coaching sessions have covered the set of shots needed to establish a 4-ball break from Hoop 1, using 2 or 3 bisques. This involves shooting at a ball near a boundary, using a bisque (or a half) if you miss, and immediately putting the roqueted ball as pioneer at Hoop 1. You then visit and position the other balls, using a further bisque on the way so that you arrive back at the Hoop 1 pioneer with a continuation shot to roquet it and make Hoop 1.
I have a few things to say here, which may seem obvious but observation shows they need spelling out. First, you can use the second (or even third) bisque anytime along this path, wherever it is best played in order to build the position; it does not have to be taken immediately before you finally roquet the Hoop 1 pioneer. Second, you can do the same thing to start a break from any hoop later in the game. Third, don’t slavishly follow this procedure if there is already a pioneer at Hoop1! (Yes, I have seen that done). And fourth, be flexible as to how you arrive at the desired position. For example, you might find that the first ball you hit is already a good pioneer for Hoop 2, so think about leaving it there and getting the other balls in place in a different order. I have seen a player abandon this sequence with a bisque already used because he had not managed to get his pioneer (partner ball in this case) at Hoop 1, but at Hoop 5. All he needed to do was to play a full roll to Hoop 1, and use his second bisque to get underway. Instead he ran away to the east boundary, and his opponent got underway by using one and a half bisques.
Mostly, bisques should be used in this constructive way. How else should bisques be used or not used? Well, you need to strike a balance. The worst thing is to use them only to correct mistakes, such as blobbed hoops. You need to use them mainly to construct or (very important) to tidy up a break. It makes sense to use a bisque if you have a 4-ball break opportunity well in place and you blob a hoop. You would expect to use one or two bisques to construct a 4-ball break, so to use one to continue a break rather than hand the innings to your opponent is certainly worth it. It also makes good sense to use a bisque to make a good leave against a strong opponent, e.g. having gone round to penult or rover, to get a safe leave (such as opponent wired at your rearward ball’s hoop). However, it is the most dreadful waste of opportunity to use bisques only to mend mistakes. Each bisque used entitles you to hit your striker’s ball SEVEN times, making 3 roquets, 3 croquets and the final continuation shot. Surely something useful can be made from that!
4 Build the break
Your opponent may break down and hand you a break, but you should not be relying on your opponent’s mistakes. Instead you should be exploiting small opportunities in order to build your own breaks. Building a break out of nothing much is one of the most satisfying aspects of the game. It is of course vastly easier to build a break when you have bisques, but you need to be able to do it without the support of bisques, otherwise your game will come to a halt every time you run out. One sees all too many players make no more hoops once the bisques have gone, simply because they are not putting a break together.
So how do you build a break? This looks rather daunting, especially when the bisques have gone. Visualising a sequence of shots that goes from a hit in to a 4-ball break position is a challenge, but it is really not that difficult to see how to do this if you think of the process as being composed of an appropriate selection of set pieces. With experience you will acquire the ability to recognise a range of situations that are similar to ones you have seen before, and then to select a sequence of steps to build the break. This will often include the problem of incorporating a ball on a boundary (and especially in a corner) and promoting it into the required position over one or more shots. Sometimes you will need to visit a ball several times, probably by rushing a ball to it and exchanging it for the rushed ball, improving the position on each visit until all balls are in the game.
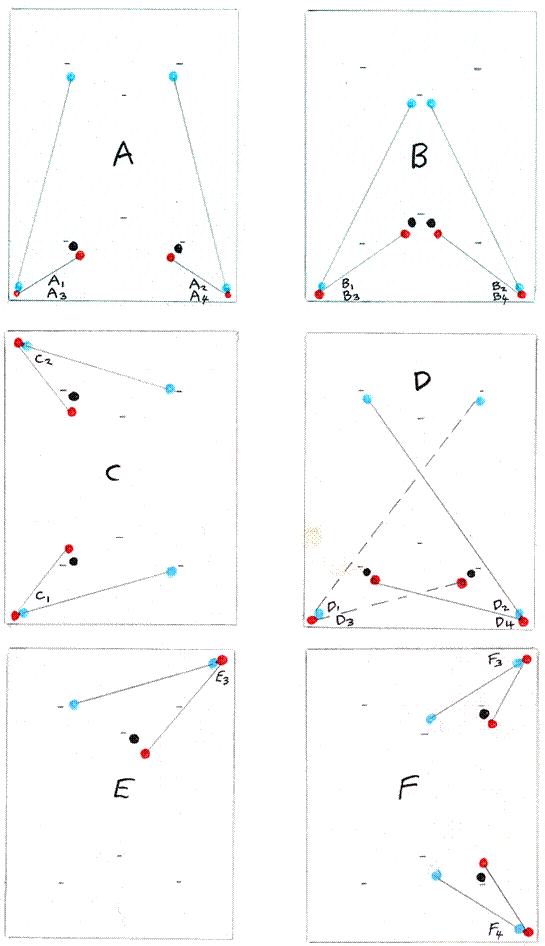
Other times you will be able to get a ball fully into the game in the one shot, usually from a position on one of the yardlines. This might be a shot of some difficulty, but the one difficult shot may be all that is needed to secure a 4-ball position. Of particular note are the opportunities that arise when the ball that you want to bring into play is in or near a corner, and I’d like to look at these in some detail. It is well worth practising these as part of your repertoire of set pieces. What we would like to do is to take off to a corner ball, roquet it, and use the croquet shot to place it as the pioneer at the next hoop but one, getting the striker’s ball to the pioneer that is already waiting at the next hoop. This may be needed right at the start of a break, or during the break. If we forget about Rover as next hoop on the grounds that it doesn’t have a next but one, then with 4 corners and 11 hoops there are 44 such positions. If you examine all 44 you will find that most of them are so difficult that it is not worth trying the shot, but there are 17 that are quite feasible, covering all 4 corners. And because some of the layouts have multiple application to different corners and corresponding hoops, it turns out that only 6 distinct layouts are needed for these 17 positions. As to their relative difficulty, three are easy, two are a bit more difficult, and the other one is more difficult again.
They are described in more detail in the Appendix, but here’s one (labelled shot B in the table, played from Corner 1 when you are for Hoop 5- a shot of medium difficulty) to get the idea. You (red and yellow) have advanced red a few hoops in a 3-ball break and now having made Hoop 4 and roqueted blue at a point just beyond the hoop, you want to bring into play black, which is in (or close to) Corner 1. Yellow is in place as the Hoop 5 pioneer. Do a good thick take off to Corner 1 from the left side of blue so that it moves north towards the middle of the lawn, and roquet black. The croquet shot needs to be a half roll, split to put black to Hoop 6, getting to yellow with red. Once you’ve made Hoop 5 you can easily carry blue and yellow forward into a classic 4-ball break from these positions.
5 Pursue realistic ambitions, and build your technique
In a serious game (i.e. one that you want to win) it is pointless to try things that you know are very difficult for you and therefore likely to go wrong. However, pursuing realistic ambitions does not mean only that you should not be attempting things that are too difficult. There are two sides to this coin. Let me explain. It is quite common to see a player attempt a shot that is well beyond his technical capability, and not get the desired result. However, you will often see the same player decline a shot that is easily within his capability, even though there was much to be gained. So, in a game you should not be trying to play beyond what is within your technical scope, but you should be fully applying what you are capable of. Your technical skill will improve both in play and in practice sessions. Clearly, you don’t want to be attempting shots that you know are not reliable for you in the course of a serious game, so the time to work on them is in a coaching game or in a practice session. In a practice session you can concentrate on particular aspects in a selective manner, working on a shot that is challenging for you until it is part of your reliable repertoire. As your technique improves, so you will be able to pursue a wider range of tactical objectives.
6 Arrange for the next shot to be easy
Whatever kind of shot you are playing, bear in mind that running a hoop, or making a roquet, is only one of its objectives. You should also be playing so as to make the next shot as easy as possible. This is why, in a hoop approach shot, you need to decide where you want to place the croqueted ball so that it is in a useful position beyond the hoop for whatever you need to do next.
What is it that makes a shot easy? Well, a short shot is always easier than a long shot, so, you will want to arrange for shots to be short, and therefore you need to hit at the right strength, not too hard (a very common failing), not too soft. Then it is also the case that a straight shot is more likely to succeed than one that requires a split, because in the straight shot you don’t have to judge angles. So, you will want to arrange for shots to be straight. This is why, for example, after making Hoop 5, you would want to look at the position of the Hoop 6 pioneer, and then probably rush the reception ball over towards Hoop 3 so that the croquet shot placing the pioneer at 1-back will be a nearly straight shot getting striker’s ball to the Hoop 6 pioneer.
7 Hit in and get to two balls close to each other
If your opponent leaves yours separated and his joined up, you need to get to the joined up balls by some means. You might do this by hitting in to your partner ball, using a bisque if necessary, then do a take off (thick perhaps, to promote your partner ball to somewhere useful) to get near the two balls that are together. Now what you need to do is choose one to hit and then in the croquet shot promote the croqueted ball to a more useful position whilst getting in a good position to rush the other ball to your next hoop, and make the hoop. This opportunity (of getting to two balls) is also one of the ways you will be able to get a break going once you have run out of bisques, having hit in without a bisque.
Once you have hit one of the two balls it will sometimes be best just to take off to get the rush position on the other ball. I have lost count of the number of times I have seen a player spoil this chance by roqueting the first ball so hard that it goes yards away from the second, so that instead of an easy two-foot take off he has a difficult 5-yard take off, and all to no advantage in the position of the first ball. You should also be looking to see if there is the prospect of promoting the first of the two balls, not just taking off from it.
What are you are going to do to get a break going without bisques? I have seen a player who has run out of bisques hit in to partner ball, take off to opponent’s joined up balls, then roquet one and in the croquet shot send it to be pioneer at the next hoop, then join up with partner ball but not in a good rush position, having done nothing at all with the opponent’s other ball. The result is of course that the opponent moves the ball that was placed as a pioneer, and maybe hits in. What should he have done?
There were two good opportunities he could have taken. First, he could possibly have got a break going (or at least made his next hoop) by getting a rush on the close-by ball. Second, as the game was well underway, and he was for two different hoops, he could have put his opponent’s balls as pioneers at these two hoops before joining up carefully, leaving himself a rush to somewhere useful such as one of these hoops. Instead he continued to play as described above, and made only two more hoops before losing.
Another use for this little set piece on two balls is to compensate for a poor pioneer. If you have failed to place a good pioneer then remember that having two balls together is as good as a pioneer if you get to one ball, take off and with the continuation shot rush the other to your hoop. During a break that is still untidy, or if a shot placing a pioneer goes wrong, there will often be an opportunity for you to put the two balls together and use them in this way.
8 Place pioneers at your hoop(s), and not at opponent’s
Not much needs to be said about this, except to remind you that black placed at black’s hoop and blue at blue’s (assuming these are different hoops) is a good leave because a ball at its own hoop is not a pioneer for itself. Of course, if you are for that hoop, your opponent’s ball is a pioneer for you. The other side of this coin is to look for opportunities where you have been left a pioneer at your hoop. If you still have a bisque this is a give-away as a start to a break.
9 Look at the bigger picture
The classic example of this is when you have approached a hoop and failed to get into running position, but could make it using a bisque. You have not yet played the continuation shot. The mistake is not to look first at the other balls, because very often you could use the continuation shot go to the furthest one, improve its position, likewise improve the other ball before coming back to the hoop where the ball you originally approached with is waiting as a pioneer.
However, there are many other examples where a look at the bigger picture would yield opportunities. One that I often see arises when you have made a hoop or two in a break, but then it goes wrong on something that should have been easy. Your opponent doesn’t hit in, and you quickly come back on the lawn with your recent disappointment still at the front of your mind, determined to continue playing the same ball. This focus on the ball you have just played causes you to neglect taking a look at the full position, and perhaps missing out on a better opportunity by playing the other ball.
10 Take opportunities, but not always the obvious ones
It is very common to see players declining the opportunity to approach a hoop in a croquet shot that is rather speculative, even though a safe exit would still be available in the continuation shot if the ball doesn’t get into running position. These speculative approaches might be some form of stop shot from a boundary, croqueting opponent’s ball to be pioneer at the next hoop but one, a safe distance away, or perhaps a lengthy take off. These marginal opportunities can make the crucial difference between getting a break going, and languishing in defensive leaves that rarely lead anywhere and give opportunities to your opponent.
Taking opportunities does not always mean going for the hit in, or running the hoop. It may be better to do something else. For example, in a game where all bisques have gone you have pegged out your opponent’s black, and are for Rover with yellow. Opponent gets a 3-ball break going, but blobs 4-back leaving yellow just beyond the hoop and blue almost touching the outside of the right wire, with red at Penult. He cannot run the hoop, and he cannot hit either of your balls. What are your options? Yellow can see a little of blue but could well miss. A shot at red might hit but is doubtful, and even if it hits, the roll to Rover is unlikely to succeed, so you would probably have to go and lay up a rush in a wired position somewhere on a boundary (please don’t leave them joined up at Rover for your opponent to shoot at!). Although the wired leave is a good tactic, none of these shots is particularly easy for you as a recent beginner. However, there is one quite easy shot that could well yield an advantageous result, and which doesn’t even require you to hit anything, and that is simply to hit yellow fairly gently over to the right of red, hoping to get position for a rush to Rover to be executed after your opponent’s next shot. You will still be wired from blue, so he has no shot to hit in with. If you get the rush position you should win from there, and if you don’t get the rush position you will still keep the innings.
Appendix: Picking up the 4 th ball
|
CORNER 1 |
CORNER 2 |
CORNER 3 |
CORNER 4 |
HOOP |
|
|
|
|
1 |
A |
|
|
D |
2 |
|
C |
|
|
3 |
|
D |
A |
|
4 |
|
|
|
F |
5 |
B |
|
|
B |
6 |
|
|
E |
|
1 back |
|
A |
D |
|
2 back |
C |
|
|
|
3 back |
D |
|
|
A |
4 back |
|
|
F |
|
Penult |
|
B |
B |
|
These are the more readily achievable opportunities to get a 4th ball out of a corner and immediately into the game in one shot. By way of illustration, shot B from Corner 1 when for Hoop 5 has been described at the end of Section 4.
How to use the table.
The top row indicates the position of the ball that you wish to bring into the game. And of course, you will play the necessary croquet shot from that corner. Suppose the ball is in Corner 2. Look at the letters in the column beneath that heading. In this case these are C, D, A and B. At each letter look over to the far left of that row where you will see a hoop number indicated in the first column. This is your next hoop, at which you must already have placed a pioneer. In this case you have four worthwhile opportunities to pick up the 4 th ball when it is in Corner 2, and these are with shot C when your next hoop is Hoop 2, shot D when your next is Hoop 3, shot A when next hoop is 1 back, and shot B when next hoop is Penult. The lack of an entry in the table means there isn’t a worthwhile opportunity for that combination of corner and hoop.
The accompanying diagrams (below) summarise the six distinct layouts A-F shown in the table.
Suppose the opportunity you are going for is shot A from Corner 2, when the next hoop is 1 back. You will have put a pioneer at 1 back straight after you made Hoop 5, getting to Hoop 6 and making that hoop off its pioneer. Once you have made Hoop 6 and roqueted the reception ball you need to use the croquet shot to get your striker’s ball over to Corner 2, and roquet the ball waiting there. Then in the croquet shot (and this is the shot labelled A) you must send the croqueted ball to be the pioneer at 2 back, getting to the 1 back pioneer with your striker’s ball. Don’t worry too much about the position of the ball that you roqueted and croqueted immediately after Hoop 6 in order to get over to Corner 2, except to move it down the lawn in the direction of subsequent play. Whatever you do with it you should be able to get to it easily enough after you have made 1 back, and then you will have all the balls in play.
As you work through the table you will see that the general idea is always the same; you are playing a croquet shot from a corner, putting the croqueted ball to be the pioneer at the next hoop but one, and getting your striker’s ball to your next hoop where a pioneer is waiting. The thing that varies is the layout of the shot (that is the destinations of the balls relative to the place you play the shot from). Each layout is labelled with a capital letter, but as you will see some of them are repeated in the table. This is because in several cases the same layout - or its mirror image – can be applied several times, as shown in the diagram. Look at shot A, for instance, and see how it applies identically in Corners 1 & 3, and its mirror image in Corners 2 & 4.
In three of the six layouts (A, B & D) you get full value for money with four applications, one in each corner (a layout and its mirror image, each applied twice). C and F each have two applications, and E just one. As to the easiness of these shots, I would place them in this order: A, C & F are easy, B & E are of medium difficulty, and D is more difficult.
As to how to incorporate them in your repertoire, I would suggest practising A, B & D first, as they each have four applications, and they cover the full range of difficulty. Once you have mastered these, add C & F, which are easy, and each has two applications. Finally add E, of medium difficulty and only one application.
If you can do these shots you will be able to build breaks. And bear in mind that with slight adaptations these shots can be used to get balls from other places, not just corners.
Key : A1 means SHOT A LAYOUT played from Corner 1, and so on for the other shots .
-end-